


Collect the first 30 Amber with a route
Use the numbered 30-Lumin-Amber itinerary for individual Atlas pins through Nimbus Fields, The Argent Strait, Forest of Falling Stars and Sea of Flowers. Each stop is a distinct one-Amber pickup; keep checking your actual inventory if some were already collected. Your chosen Branch still needs its own regional Bronze Badge.
Choose a Prismana form for your roster
The official English Index uses Prismana Form; the official Traditional Chinese localization uses 虹彩型態. Community searches may call it 虹光, but that shorthand is not the official form label. In every tool and guide, the stable identity is species plus exact form, for example Blazen · Prismana Form, not “rare Blazen.”
| Axis | Check | Use it to decide |
|---|---|---|
| Elements and role | The form’s own Aniilog record | Which coverage, sustain or damage job it fills |
| Skills and trait-facing kit | Named form skills, role and published build data | How it changes your rotations and build options |
| Movement / Homeland | The fields listed for that exact form | Whether it adds traversal or Homeland value |
| Evolution and build fit | The selected form’s legal evolution route and team job | Where it fits your current and future roster |
| Sparkling | A separate appearance status on the individual copy | Whether the catch also meets your collection goal |
| Potential and personality | The individual copy’s own stat distribution | How this copy compares after you acquire it |
Begin with your biggest team gap. Sustain usually matters more than adding another damage carry, while a missing element can open matchups your current four cannot cover. The Advisor explains both recommendations so you can compare the exact Aniilog forms before choosing.
You lack sustain
Prioritize a known Prismana HEAL or REGEN form before another damage carry. Open the exact Aniilog form and compare its skills with your current healer.
Your team misses an element
Prioritize a form whose verified elements close the Planner gap. Serialize the four members in the Team Planner.
You already own the candidate
Prioritize replacement difficulty, build use and collection value instead of raw novelty. Review the build hub and current acquisition route.
Evaluate a duplicate as a build candidate: compare its exact form, Potential distribution, personality, acquired skills and current investment. The Aniimo evaluator helps with the keep-or-release decision, while the Sparkling guide covers the separate appearance axis.
What Prismana Flow is
Prismana Flow is a named regional weather state, like rain or a thunderstorm. When it settles over an area, that region’s mapped Prismana-form Aniimo can appear in the wild. It remains the same species but uses a distinct exact-form record for its elements, skills, role and build options. Compare it with other regional and weather forms in Aniilog.

Turbo
 Wind
WindThe Wind-type you already know from Nimbus Fields, sold on the map’s habitat table as a common local spawn.

Prismana Turbo
Wind Dark
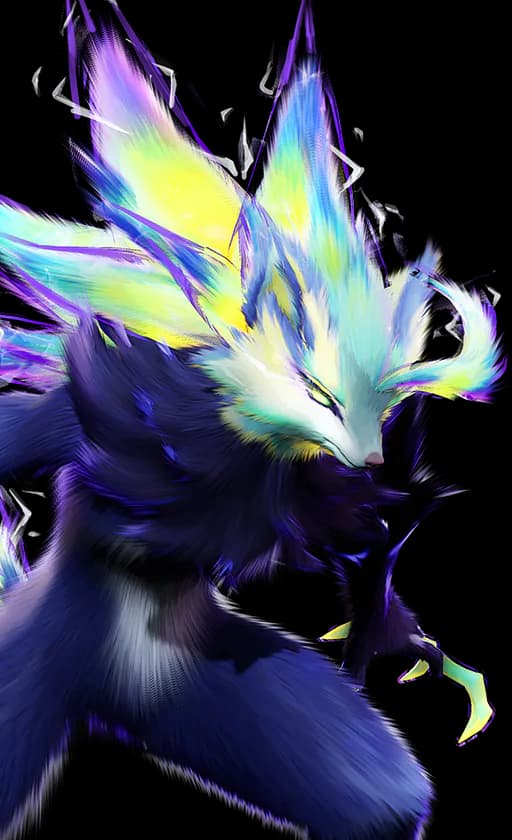
DarkA Dark/Wind exact form with its own form-facing record, surfaced through Prismana Flow or the Nurture route.

The in-game forecast tells you where the Flow will strike next, which makes the weather panel the most useful screen in the game for a form hunter; the Aniimo weather guide reads that forecast card in detail. The game tracks the state internally under the name aurora, and every spawn in a region’s aurora list is a Prismana form.
When the Prismana Flow icon lands on your HUD, drop whatever you were doing.
How to trigger Prismana Flow
Two routes lead to a Prismana, and both are gated behind your Area Badge progression in that region. Waiting for the weather to arrive on its own is the third route, and it is the slowest.
- Bronze40% Area Catch CompletionNurture Ecosystem. Nurture the region, then activate a Wild Surge (the Group Appearance of the test builds) to draw nearby Aniimo together.
- SilverEcosystem Intervention. Spend Vein energy to change the area’s weather. Radiant Prismana Flow attracts rare Prismana Aniimo.
- GoldPrismana Energy Resonance. Ecosystem nurturing grants a fixed amount of Prismatic Energy toward the guarantee.
The Bronze Badge sits at 40% Area Catch Completion, and catching different Aniimo in the area is what moves the number. One steady sweep through a region’s species list opens the whole loop.
The free route: Nurture a Wild Surge
- 1Stock 30 Lumin Amber
They lie in the open world and drop from Lumin Collection challenges. Your companion robot BINI announces any Lumin Amber nearby, and a tracker walks you straight to the pickup. Some map text lists them as Lumen Embers.
- 2Submit them at the Branch
Earn the region’s Bronze Badge, then hand 30 ambers to the Branch. The map carries a Submit Lumin Amber shortcut, so the trip costs nothing but a teleport. That badge is 40 percent Area Catch Completion, and the Path of Discovery courses in Elite Training pay you a second time for the same catching, region by region.
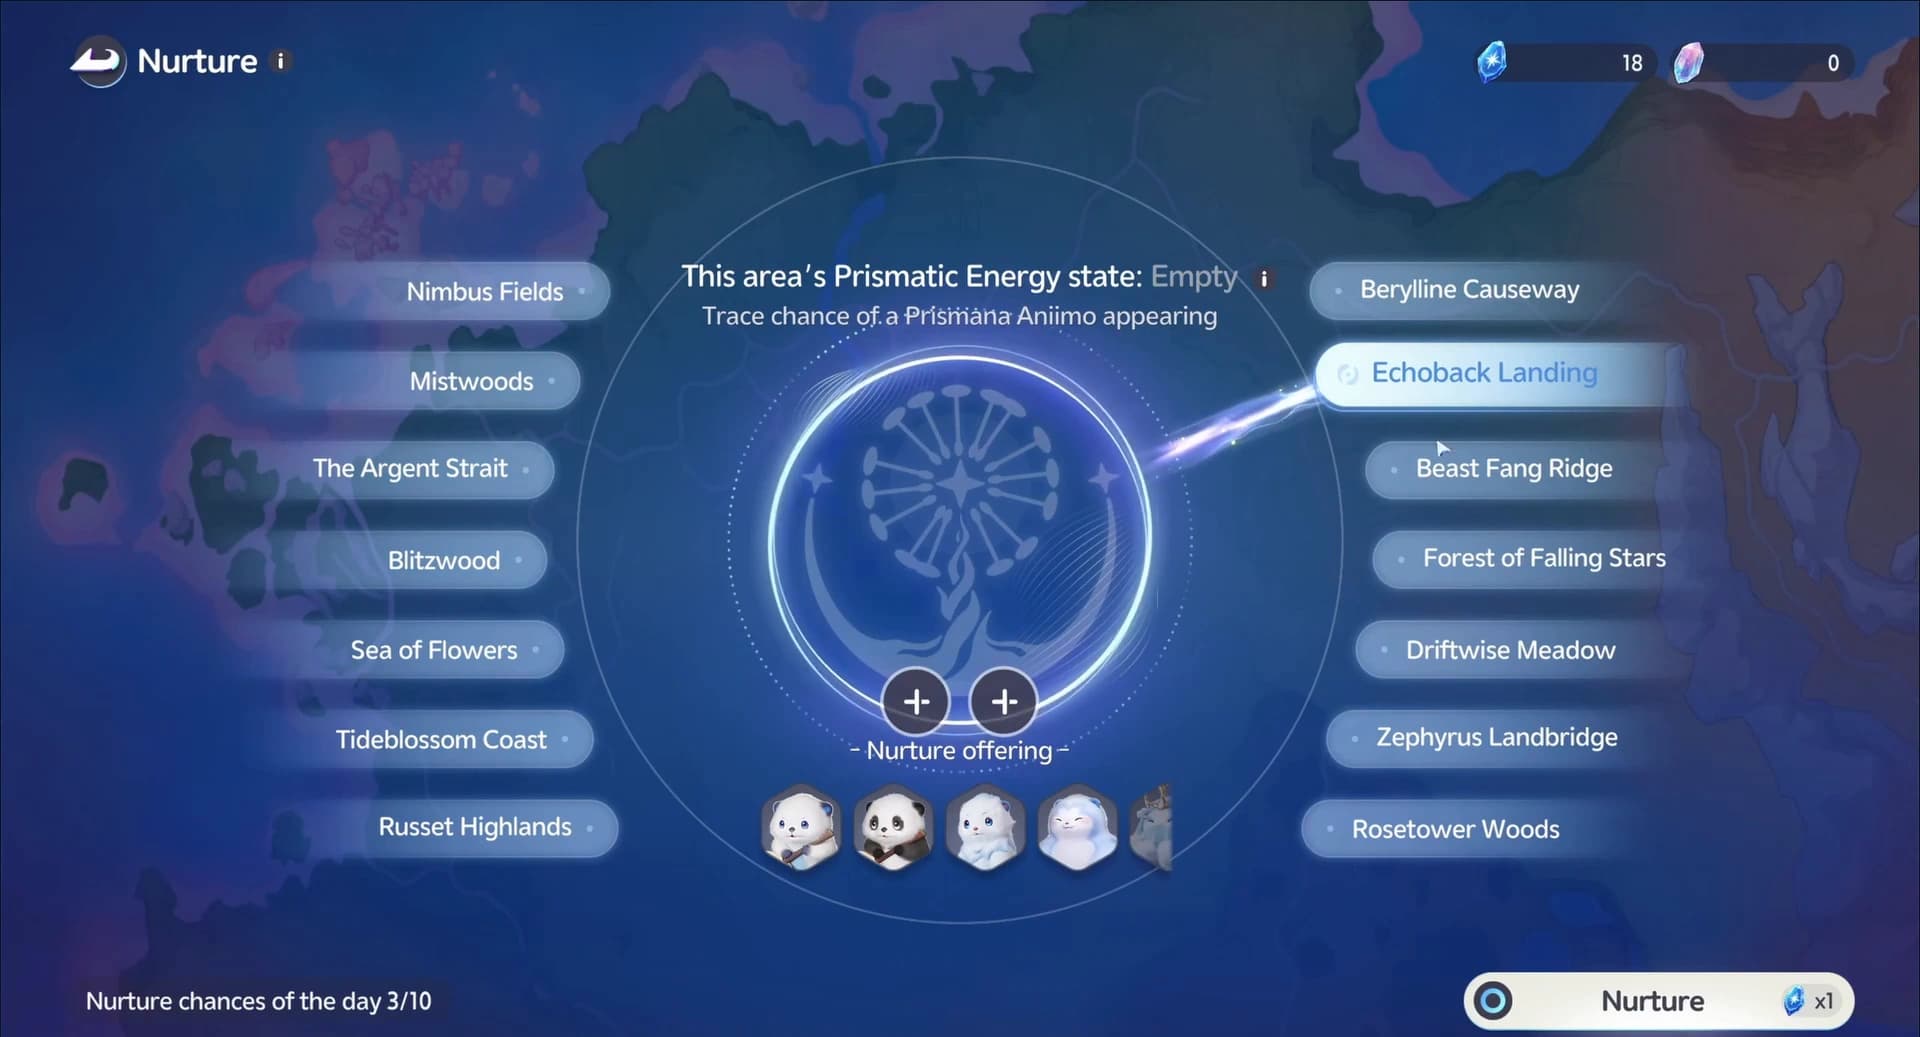
- 3Nurture the area
A Branch completes one energy infusion at 04:00 daily and banks up to 3 of them, so Nurture on a stored charge costs no stamina and a Branch left alone for two days still has free runs waiting. Past that allowance, 10 more Nurture runs a day are bought with Primegy, and the Nurture screen counts your remaining chances.
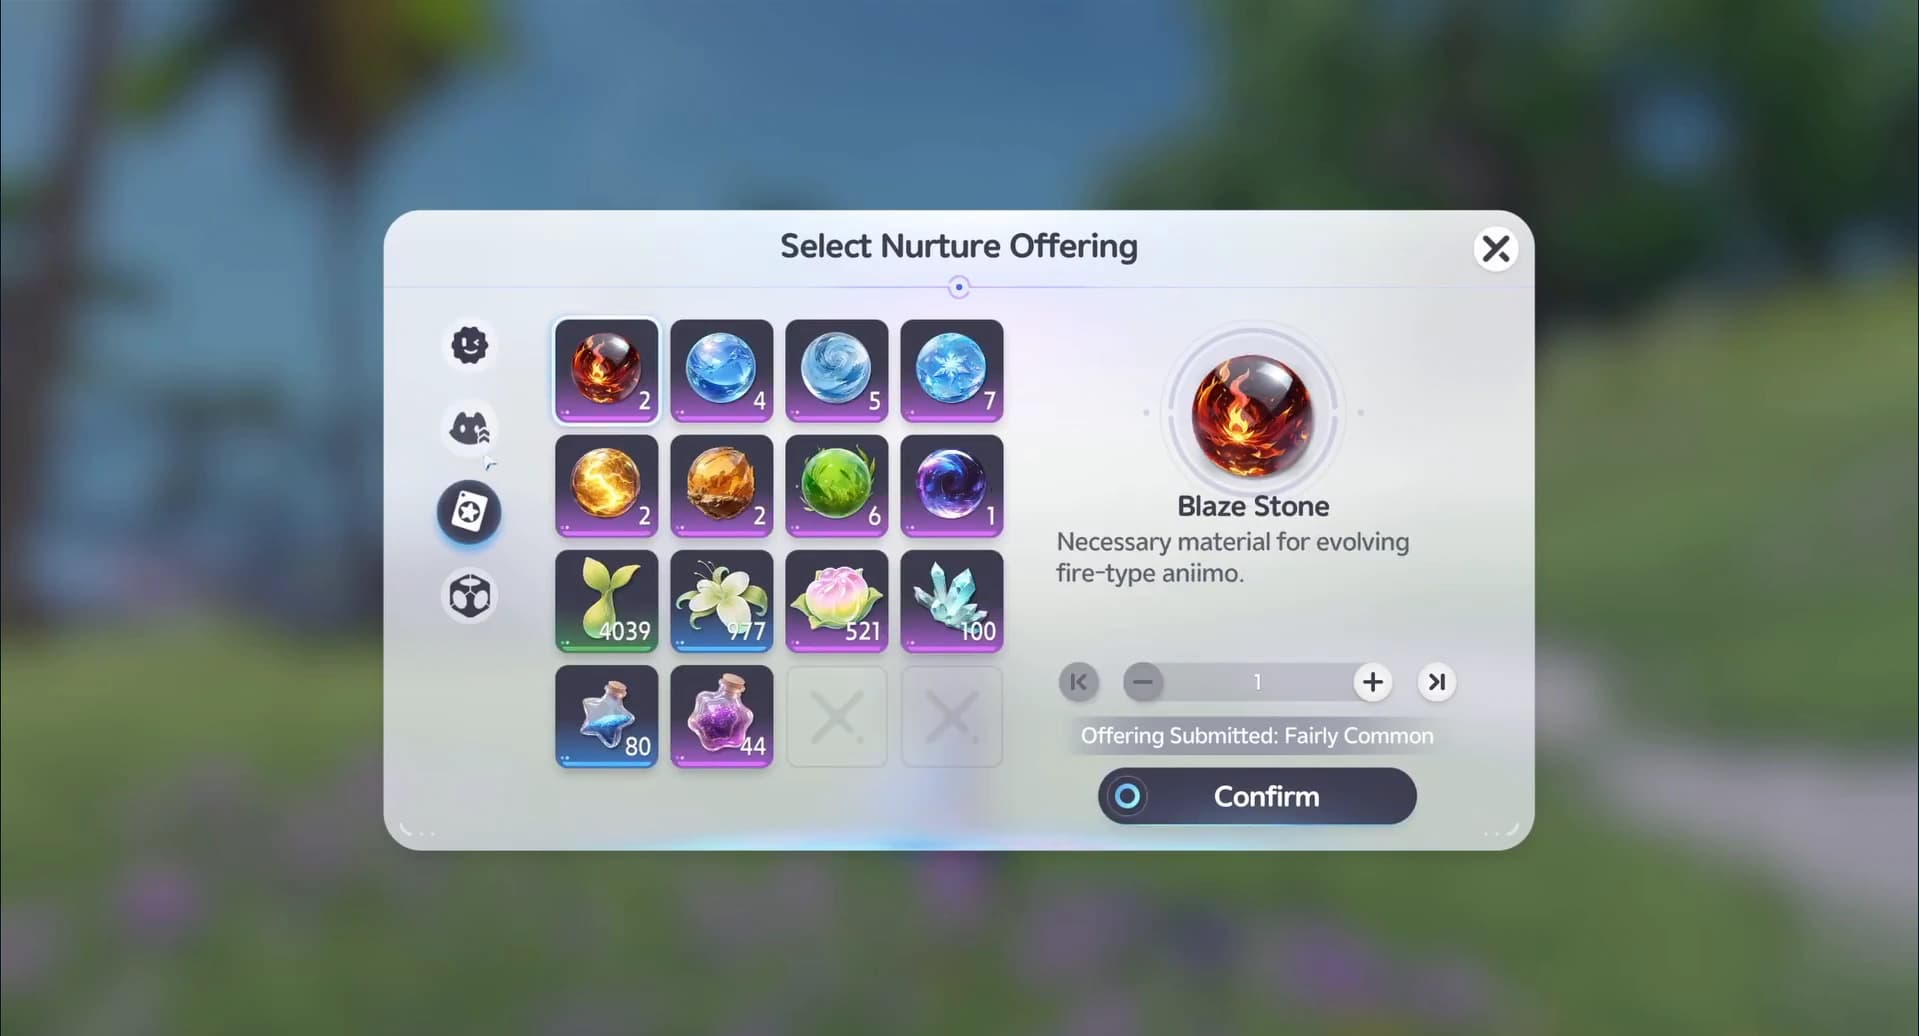
- 4Offer what you already carry
The offering picker takes ordinary materials: evolution stones, Growth food and potions. Offering quality does not affect Wild Surge quality, so Growth Fruit is the default low-cost entry.
- 5Catch through the Wild Surge
Catch rather than defeat the gathered Aniimo. A catch can produce a lucky strike, granting item rewards, raising the area’s Prismatic Energy and sometimes triggering Prismana Flow directly.
- 6Build toward the guarantee
Every Nurture has the same base chance to trigger Prismana Flow, and each use adds a fixed amount of Prismatic Energy toward the guarantee.


The crystal route: change the weather
With the Silver Badge and Ecosystem Intervention in hand, one Prismana Crystal fed to the Branch triggers one Prismana Flow over the area outright. The cap is three activations per day with a one-minute cooldown between uses, so this is a burst tool rather than a farm. The Change Weather panel itself, its weather options and its daily counter are walked through in the weather guide.

The Prismatic Energy gauge
Every Nurture has the same base chance of triggering Prismana Flow, so low Prismatic Energy does not reduce that base roll. The per-area meter records progress toward the guarantee, and ecosystem nurturing adds a fixed amount each time.
An offering pays the entry cost for Nurture. Its quality does not affect Wild Surge quality, so use inexpensive materials such as Growth Fruit by default and save premium offerings for another purpose.
| Reading | Value |
|---|---|
| Chance of directly triggering Prismana Flow | 3% |
| Prismana required to trigger pity | 10,500 |
The full six-stage meter, every Vein Essence price and cap, the 32 offerings that steer which Aniimo a Bloom draws, and the weekly Vein Abundance rotation are broken down in the Nurture and Vein Abundance farming guide.
The items of the loop
 Lumin Amber
 Prismana Crystal
 Vein Essence
 Growth Fruit
 Veinlit Fruit
 Prismana Mark
- 1Lumin Amber
Lumin Amber is refined Vein energy. 30 of it unlocks Nurture at a Branch.
- 2Prismana Crystal
Each Prismana Crystal triggers one Prismana Flow. Three per day, one-minute cooldown. The Mysterious Vendor tracker shows when its Credits stock rotates, and the reset timer tool counts down the 04:00 restock.
- 3Vein Essence
Vein Essence repairs Vein damage and feeds the Vein economy the Nurture loop guide prices out. The 10 extra Nurture runs a day are bought with Primegy instead. Restocked from the Fun Stamp Collection Shop, Elite Training and Catch Completion.
- 4Growth Fruit
Growth Fruit is the default Nurture offering because it covers the entry cost with an inexpensive material. Restocked from Elite Training and the Credit Shop.
- 5Veinlit Fruit
Veinlit Fruit is a high-value Nurture offering that grows where Vein energy is dense. Offering quality does not improve Wild Surge quality.
- 6Prismana Mark
The Prismana Mark is given for releasing a Prismana Aniimo and accepted as a Nurture offering. It does not improve Wild Surge quality.


Landing the catch
A Flow puts exactly one Prismana in the region at a time, and the spawn does not repeat. Plan the catch before you trigger anything: know where the form walks, and have the right Aniipod on the wheel.
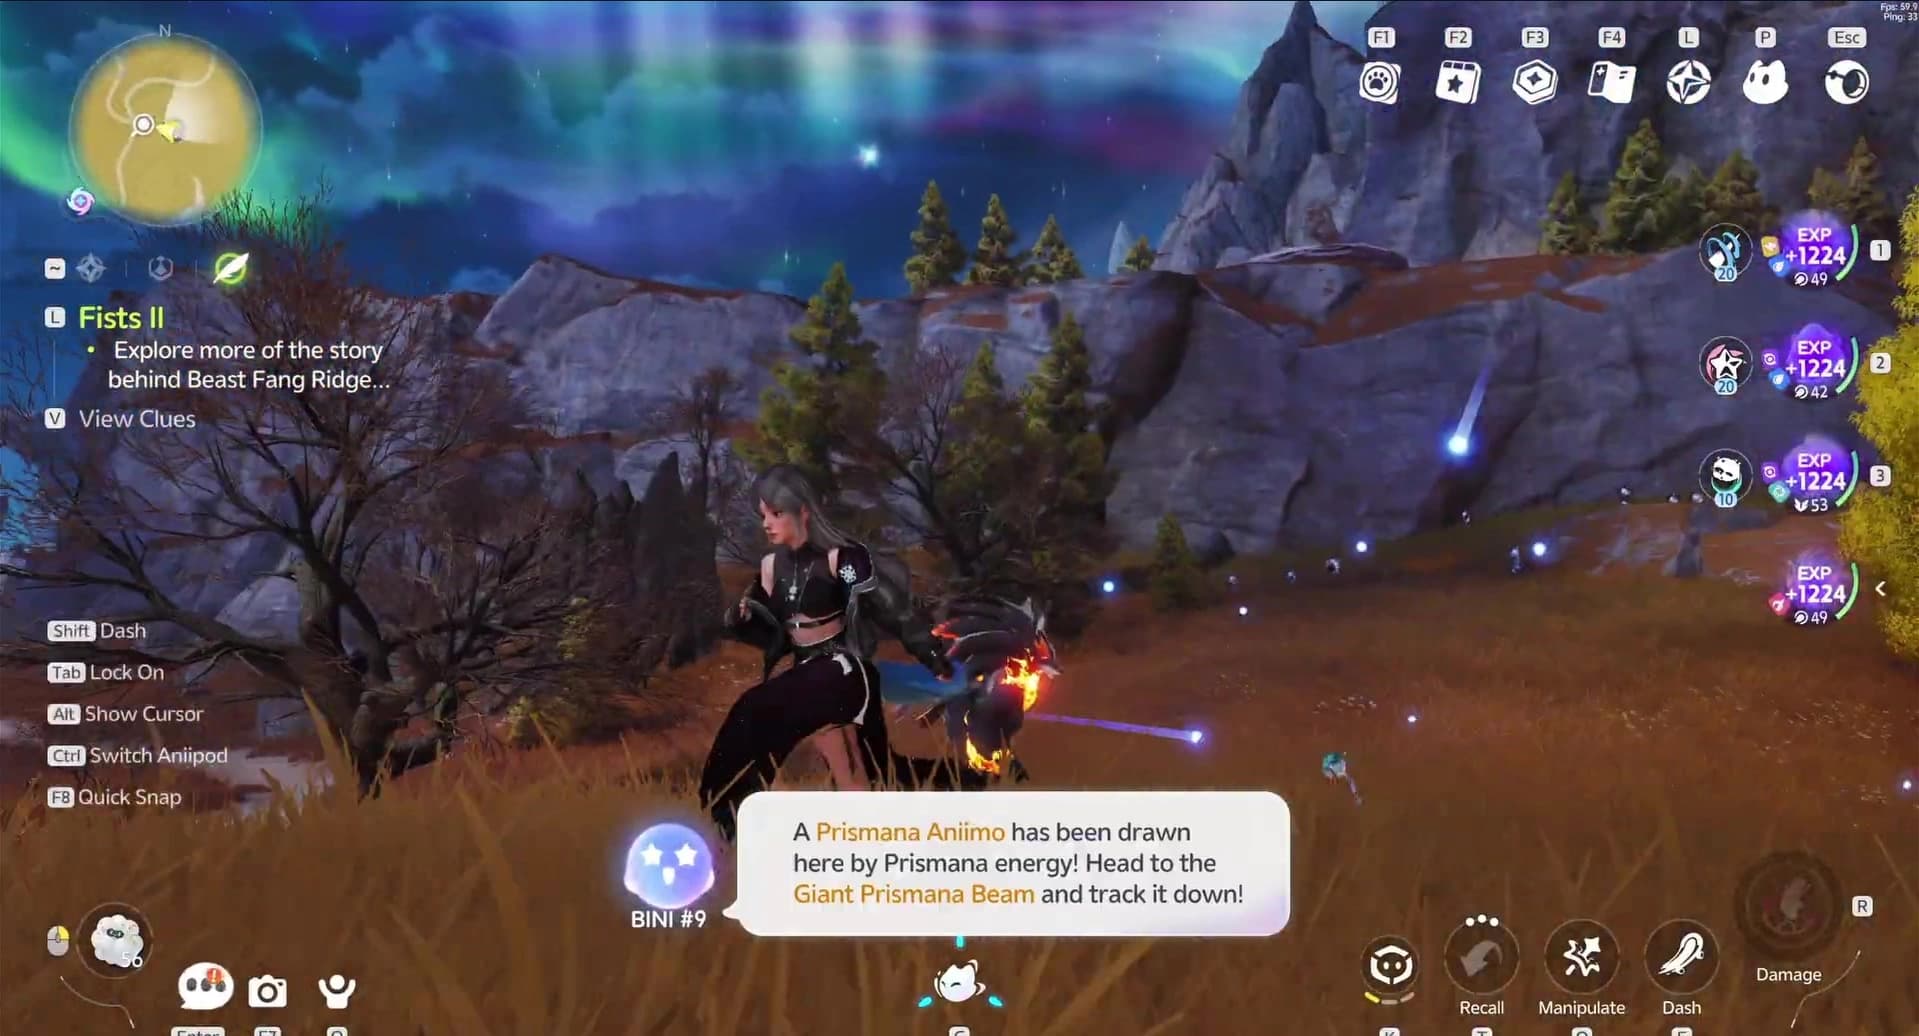
A Nurture spawn announces itself. BINI posts a message on screen, a Giant Prismana Beam rises over the spawn point, and the location shines in a special colour until you arrive.
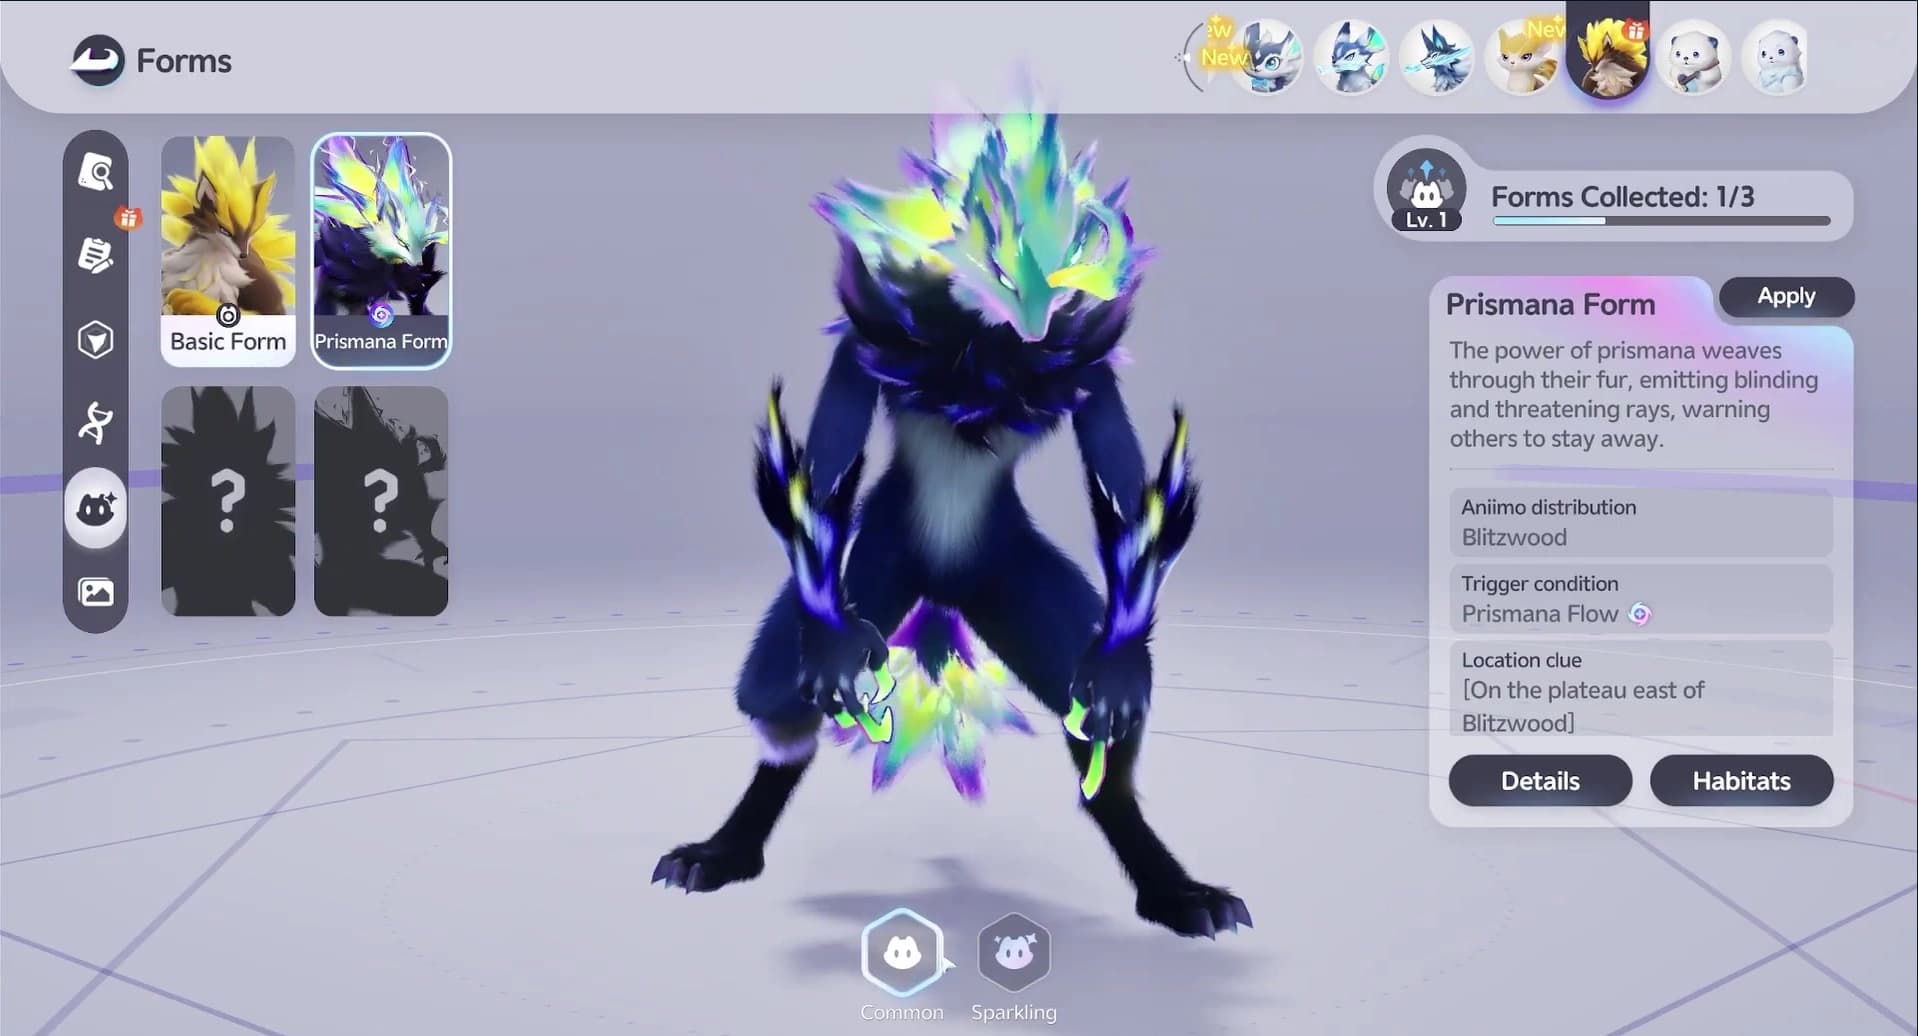
A weather spawn is quieter, but the Aniilog already knows where it lives. Open the species’ Forms tab and the Prismana entry lists its distribution, its trigger condition and a location clue. Blazen’s clue reads on the plateau east of Blitzwood, and that plateau is exactly where the form walks.

If the catch has to stick, throw a Sparkling Cube. It guarantees the catch, Perfect Potential and a Sparkling result, so a Prismana caught this way comes out a Sparkling Prismana with Perfect Potential. The catalogue prices it at 3,000,000 Credits, which makes it the flex option rather than the cheap one.

Umbral Aniimo and how they differ from Prismana
An Umbral Aniimo is a separate rarity from a Prismana form: it carries Perfect Potential and a dark recolour, and it is lost when the Aniimo evolves. Where they appear, how the 50% Breezy Plains uplift works and which eggs guarantee one are all in the Umbral Aniimo guide.
Use the Sparkling guide for the separate appearance status, the rare variants glossary to tell all eight rarities apart, and the Potential guide to read a Perfect Potential result.

Nurture and the Blooms
Every named region carries a Nurture point, marked on the ground by a Bloom. Fourteen sit across the Breezy Plains, one per region, and one more sits on the Whisperwake Isles in Crescent Bay, for fifteen in total. The Nurture screen at the Branch lists the same fourteen regions side by side.
Every Prismana form, region by region
Two in-game tables answer the question "where does this Prismana appear": the map’s weather spawn table, and each form’s own habitat data. They agree in most regions. Where they disagree, both readings are listed with their source.
- Lv 5–15
Nimbus Fields
- Lv 14–20
The Argent Strait
Both agree - Lv 16–23
Forest of Falling Stars
Both agree - Lv 19–28
Sea of Flowers
Both agree - Lv 23–30
Beast Fang Ridge
- Lv 24–33
Mistwoods
Both agree - Lv 28–35
Blitzwood
Both agree - Lv 30–38
Echoback Landing
Both agree - Lv 34–38
Berylline Vale
- Lv 38–42
Driftwise Meadow
Both agree - Lv 39–43
Rosetower Woods
Both agree - Lv 40–45
Russet Highlands
Both agree - Lv 45–48
Zephyrus Landbridge
Both agree - Lv 45–50
Tideblossom Coast
- Lv 50–55 pocket
Crescent Bay
Level pocket



















Special unlocks
Four forms arrive from other systems entirely. Two of them also walk the wild, so the table pairs each unlock route with what the map data holds.
The launch version reworks season-exclusive Prismana spawn rules around clearer trigger conditions.
Two of those routes are long ones rather than hunts. Fulmintis comes off the Companion Handbook track, and Fenmane waits on RV Level 10, which is a Homeland build order rather than a field trip; the Homeland priorities guide sets that order for a free account. Both species have a build page once you hold them: Fulmintis, Fenmane, Glynsera and Somniwing.
 Fenmane
Unlocked at RV Level 10
No wild spawn entry in either table Fulmintis
Battlepass reward
No wild spawn entry in either table Sherro
Complete the Aniilog
Also spawns in Echoback Landing pockets, Lv 29–37 Glynsera
Appears from Nurture in any region, replacing the local form
Also spawns on Beast Fang Ridge pockets, Lv 22–29
Hatch a Prismana
The Weekend Prayers statue produces an egg that always hatches a Prismana form, dedicated Prismana Eggs guarantee one, the Homeland RV pays a Prismana Egg at RV Level 15 and another at RV Level 18, and RV dispatches can produce Aniimo eggs with the Prismana trait. A Rainbow Glow label raises the odds on an ordinary egg without guaranteeing anything. All eggs still run on the ordinary Hatchinator timer.

The Egg born from the Pathfinder’s Prayers has appeared. Come see which Prismana Form Aniimo will hatch from it.
Glameep
 Grass
Grass Water
WaterThe Grass and Water dual-type that hatches from an ordinary egg or a Weekend Prayers roll gone the mundane way.
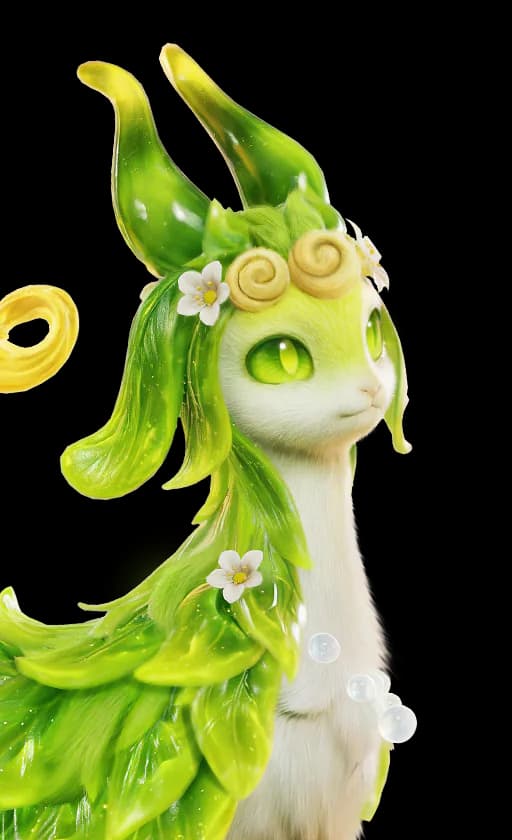
Prismana Glameep
DarkGrassOne of the 25 Prismana forms in the Aniilog, with a wild level-pocket route in Crescent Bay.

The Aniilog lists 25 species with a Prismana form. Use the catalogue below to open any species page, inspect its exact-form record and compare it with the rest of the roster.
























Convert an Aniimo you already own
A Prismana Orb turns an Aniimo you already own into its Prismana form. The Aniimo keeps its Innate Potentials, traits and personality, so a Perfect catch with the right nature stays exactly as you raised it. The Orb works on Aniimo native to Breezy Plains, and only after you have unlocked that species’ Prismana form in the Aniilog.

| Shop | Price | Limit |
|---|---|---|
| Stamp Shop, Season Hub | 900 Windborn Stamps | 1 per account |
| Mysterious Vendor, Astra | 7,500,000 Credits | 1 per day it is stocked |


Frequently asked
How should I choose a Junior Wayfarer Prismana reward?
The free reward comes from a fixed pool of 14, and the Prismana Promise guide lists all of them with the case for each. Start with the job your roster lacks most, then compare elements, build plans, carry needs and replacement difficulty. The Prismana Picker scores that pool and returns two explainable candidates for your roster.
Do I need to catch or defeat Aniimo during a Wild Surge?
Catch them. Lucky strikes happen on catches, grant item rewards, raise the area’s Prismatic Energy and can trigger Prismana Flow directly.
What is the cheapest way to get a Prismana Aniimo?
The free Nurture loop. Catch 40% of a region’s species for the Bronze Badge, submit 30 Lumin Amber at the Branch, then spend the free 04:00 Nurture charge on offerings as cheap as Growth Fruit. Each Nurture adds fixed Prismatic Energy toward the guarantee without using a Prismana Crystal.
What is an Umbral Aniimo?
An Umbral Aniimo has Perfect Potential and a dark recolour, and it is a different rarity from a Prismana form. It appears in the open world and in Egg Heist, and the form is lost on evolution. The Umbral Aniimo guide covers every source.